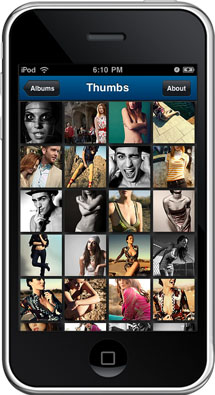


With more and more users browsing the web with a mobile device, it’s time to begin with mobile web development. In this tutorial we are going to develop a simple mobile image gallery using the amazing jQTouch jQuery plugin for mobile web development. jQTouch is a jQuery plugin with native animations, automatic navigation, and themes for mobile WebKit browsers like iPhone, iPod Touch, G1, and Pre.

Our little application is going to show some albums in a list view which will reveal a wall of thumbnails once it’s clicked. When a thumbnail is clicked, we get to the full image view where we can navigate through all the photos by either clicking on the navigation buttons or swiping over the image.
This app is best viewed on a mobile device like the iPhone or the iPod Touch, or in a Webkit Browser like Google Chrome or Safari. If you are using the iPhone or the iPod Touch (or the iPad), add this app to your home screen to enjoy the full view and features.
Just like in our previous tutorial, the Fresh Sliding Thumbnails Gallery with jQuery and PHP we will be using PHP to automatically generate albums with PHP from the folder structure.
The great thing about jQTouch is that you don’t really have to worry about much, be it the style or the JavaScript. It has pretty much all the amazing effects that we know from the iPhone as default functionality and it takes care of the right head properties. This makes it really easy to create a mobile device friendly website.
We also have a static version without albums. You can find the demo and the ZIP file at the end of this post.
So, let’s start!
The second container that we will have in our HTML structure, will be the part where we dynamically add a list of album links. We get that list automatically from our special folder structure.
The folder structure contains an image folder and a thumbs folder. Each one of those contains folders of albums. They have to be named the same, just like the images inside.
In the thumbnails album folders we will have an XML file called “desc.xml” which can be used to write a description for each image. In this file, we will write the name of the picture and it’s title. The description of each image is not obligatory which means that we can leave out images that don’t have any title or description.
We are scanning the directory called “images” in order to get all the sub folders which are our albums. Note that the each list element link will have a href for the thumbs container. The JavaScript variable “album” will keep track of the current album when we click on one of the list items.

The third container is the section for the thumbnails. Here we will populate an unordered list #thumbs with the small thumbnail images as link elements.
As you can see in the image, the thumbnails will occupy all the screen. We use a centering function that determines how many thumbnails fit into one row given a certain window width. The left margin is calculated according to the left over space.
We also resize the thumbnails if they are bigger than our predefined width and height of 75px. So, if you use thumbnails that are not quadratic and of different sizes, they will be made to fit into the list element.
Our last container will be for the full image preview. Here we will use another resize function in order to adapt the width and height of the image to fit into the viewport.
We will also add two navigation buttons that will point to the next and previous images in full preview.
To browse through the images we can either use these navigation buttons or swipe over the image (if our mobile device supports that, i.e. iPhone or iPod Touch).
Between the navigation buttons, we will add the description of the current image.
The resize function that we will be using checks if the image is bigger than the window and if it is, the image gets resized accordingly
Beside others, we define the icon for the app and the start up screen image. We can also list what images shall be preloaded. There are several parameters that you can configure. You can find all about the initialization options here.
If we use a device where we can rotate the screen, our image preview will look like this:


